Gambas al Ajillo will anchor your tapas repertoire.
Small plates may be all the current sharable rage, but they have a long and rich history across the pond in bars, eateries, and otherwise causal digs, meant to compliment the peckish day drinker. Gambas al Ajillo is a classic Spanish tapas dish of the hot variety and ubiquitous as Patatas Bravas. Compliment with artisanal bread to soak up the goodness and a crispy Albariño to round the profiles into perfect bites.
Gambas Al Ajillo (Garlic Shrimp)
Ingredients
2 pounds large fresh shrimp with tails in shells
8 cloves of garlic, minced
1/3 cup of Spanish sherry
1 cup extra virgin olive oil
1 dried chile guajillo, chopped
1 large bunch of parsley, minced
1 large lemon, juice and zest
Kosher salt
Directions
Peel and de-vain shrimp, set aside.
Add shells to a pan with olive oil, half the garlic, sherry, chile guajillo, lemon juice, and zest.
Over low heat, cover and occasionally stir for 10 minutes
Add the remaining oil and garlic to a fresh pan on medium-low heat. After two minutes, strain the shrimp stock into the pan and stir
Add shrimp and cook until the shrimp turns light pink. Add parsley. Remove from heat. Do not overcook shrimp. Serve immediately.
What makes this pasta sauce recipe magic? Shazaam: the complaints about vegetables will disappear when this zucchini pasta sauce hits the dinner table. It’s a great way to hide the fact that you’re serving something healthy with the delicious carb-y goodness of chunky pasta. And zucchini is an extremely versatile vegetable that has more texture than most other veggies, so it’s a great “hidden veggie” started to get picky eaters to learn vegetables can be good.
Tips for Cooking Pasta with Zucchini
Zucchini can release water and become mushy if overcooked, so be mindful of the cooking time. Ideally, you want it to remain tender and slightly crisp. While it’s sautéing, you can also add some extra spices like crushed red pepper, black pepper, or paprika, if you want to add more flavor to the dish as you go. When you’re cooking the pasta, you want it to turn out al dente to get the best combination of the pasta and the zucchini mixture. So, start boiling the pasta just before you begin cooking the zucchini, so everything is ready at the same time. (And then cleaning up is as easy as cooking!)
if ( unit && ( ‘metric’ === unit || ‘usc’ === unit ) ) {
document.querySelector( ‘.tasty-recipes-convert-button[data-unit-type=”‘ + unit + ‘”]’ ).click();
}
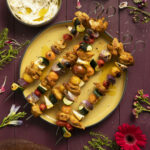
Summer grilling season would not be complete without trying a kabob recipe. This carefree recipe for Shawarma Chicken Kabobs marinates chicken in aromatic spices like clove, coriander, cumin, and cardamom, along with lemon, salt and pepper, and olive oil. Skewer it up with some fresh veggies and you will be very happy with the crowd-pleasing results.
What is Shawarma?
The word “shawarma” comes from the Turkish word çevirme, which means “turning.” It’s thin slices of meat on a rotating vertical spit, covered in a mouthwatering array of spices. This Shawarma Chicken Kabobs recipe is, by some standards, not technically a shawarma, since we didn’t make it on a vertical spit. However, it’s shawarma style due to the spices we used in this kabob recipe. The combination of coriander, cumin, paprika, and garlic are typical to what meat marinates in for shawarma.
Kabobs allow you to get a little taste of everything!
Ingredients
Scale
1 large garlic clove, minced
1 tbsp ground coriander
1 tbsp ground cumin
1 tbsp ground cardamon
1 tsp ground cayenne pepper
2 tsp smoked paprika
2 tsp salt and black pepper
2 tbsp lemon juice
3 tbsp olive oil
4–6 boneless skinless chicken thighs, cut into 1-inch cubes
1 zucchini, cut into 1-inch pieces
1 cup cherry tomatoes
1 red onion, cut into 1-inch pieces
1 turnip, cut into 1-inch pieces
Instructions
In a large bowl, add together all the spices, lemon juice, and olive oil. Whisk together to form a marinade.
Add chicken thigh cubes and toss together until coated. Let marinate or at least 1 hour or preferably overnight.
Arrange chicken and veggies on skewers and grill over high heat until everything is slightly charred and the chicken reaches an internal temperature of 165 degrees.
Recipes and Styling by Anna Franklin Photography by Laura Petrilla and Dave Bryce
The classic Negroni is a favorite among cocktail enthusiasts, and for good reason. With its perfect blend of bitter and sweet flavors, the Negroni is a timeless drink to enjoy any time of year — whether you’re looking for a sophisticated cocktail to serve at a dinner party or just want to unwind after a long day at work.
Why Does a Negroni Get an Orange Peel Garnish?
While the peel of an orange may seem like a garnish you could leave off, it actually adds more depth and an additional taste to your negroni experience. Once you express the orange peel (twist it to expel oils) it adds a fragrant aroma over top of your beverage. This slight citrus undertone is one of the most important parts of a traditional version of a negroni. Not to mention, it also adds a pop of color.
If you enjoyed learning how to craft a classic Negroni, check out our other classic cocktail recipes.
When Andrea Duran, wizard of mixology at the lively and delicious La Paloma restaurant, offered us this Pineapple Habanero Margarita, we just had to share it. Our plan is to pick a shady spot some overheated afternoon, make a batch of this drink, and put our feet up for a minute. Enjoy!
How to Make the Habanero Simple Syrup
First, coarsely chop four Habanero peppers. Then, combine the peppers in a saucepan with one cup water and one cup sugar. Stir until the sugar is dissolved. When the mixture starts to bubble, turn the heat off and let it sit to return it to room temperature. Finally, strain the liquid into a jar with a lid. You can store this syrup in the refrigerator for up to a month.
Recipe by Andrea Duran Styling by Justin Matase Photography by Tira Howard
The term “scotching” refers to the finely chopped meat wrapping boiled eggs before being breaded and fried. In this case, Mexican chorizo is used for swaddling the eggs to phenomenal results. Impress yourself and your friends with this fun and straightforward chorizo eggs with chimichurri recipe, influenced by Latin cuisine. You can also use an air fryer for this, if you’re a fan of that particular craze.
Tips for Making Scotch Chorizo Eggs
The meaty, crunchy coating on the outside of the scotch egg is what makes it a unique dish. For anyone who doesn’t like the texture of a hard-boiled egg, the scotch egg is a good workaround. But making them well is a science. You do not want too-thick of a chorizo sausage wrapping. It’s hard to cook the sausage properly if there’s too much of it!
Divide chorizo into 6 even portions. Take each piece and press it into a thin patty.
Place an egg in the center of each patty and gently wrap the chorizo around the egg until it is evenly coated and looks like a large meatball.
Place chorizo-wrapped eggs in the freezer for 20 minutes just until the outside is cold. This will make them easier to bread.
While eggs are chilling, place all chimichurri ingredients into a food processor and blend until everything is finely chopped and a sauce begins to form. Set aside for dipping.
Take 2 eggs and lightly beat them in a bowl. Place panko in a shallow bowl for breading. Dip each egg into the egg wash, then into the panko, and coat evenly.
Deep-fry each egg at 350 degrees for about 5 minutes or until the chorizo is cooked.
Remove from the fryer and place on a paper towel to absorb excess oil. Sprinkle with salt and serve with chimichurri.
if ( unit && ( ‘metric’ === unit || ‘usc’ === unit ) ) {
document.querySelector( ‘.tasty-recipes-convert-button[data-unit-type=”‘ + unit + ‘”]’ ).click();
}
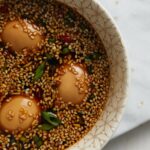
This is a traditional Korean recipe for mayak eggs. The word “mayak” means drugs as a nod to their deliciously addictive flavors!
What Are Mayak Eggs?
These Korean marinated eggs, are a popular side dish known for their tangy and distinct flavor. To make the dish, you soft-boil eggs in a marinade that’s a savory and slightly sweet sauce made from soy sauce, sugar, garlic, and other spices. The result is a soft, jammy yolk. These flavorful eggs are great with rice or noodles, or simply eaten on their own as a satisfying snack.
if ( unit && ( ‘metric’ === unit || ‘usc’ === unit ) ) {
document.querySelector( ‘.tasty-recipes-convert-button[data-unit-type=”‘ + unit + ‘”]’ ).click();
}
For this refreshing summer zucchini salad recipe, first, visit your local farmers’ market and stock up on zucchini, cucumbers, and tomatoes. Then proceed to the cutting board to chop your way toward a fresh and healthy farm-to-table meal.
How Do You Spiral-Cut Zucchini?
To spiral-cut zucchini for this salad recipe, you’ll typically use a spiralizer. First, trim both ends of a firm zucchini. If using a tabletop model, secure one end of the zucchini onto the prongs of the spiralizer and press the other end against the blade. Then, simply crank the handle while applying gentle pressure. For handheld spiralizers, you often twist the zucchini into the tool, like sharpening a pencil. While a spiralizer is the most efficient method for consistent curls, you can also create zucchini ribbons with a vegetable peeler (for wider, flatter noodles) or julienne strips with a mandoline slicer for a different texture.
Fennel Orange Salad with whipped ricotta and olive croutons won our hearts with its seductive combination of textures and wholesome flavors. This bright, elegant salad is the perfect dish to lighten up any meal. It starts by pairing the crisp, anise-like snap of fennel with the zesty sweetness of orange citrus. Then, the creamy whipped ricotta adds a smooth, cooling layer. On the other hand, the savory, crunchy olive croutons provide an irresistible textural contrast. It’s a simple, sophisticated dish that proves healthy eating can be truly decadent.
Recipe by Jennifer Girasole of Girasole Styling by Keith Recker Photography by Laura Petrilla
The beauty of baking with olive oil is that it enhances and elevates flavors and allows for the nuance of ingredients to spring forward.
The beauty of baking with olive oil is that it enhances and elevates flavors and allows for the nuance of ingredients to spring forward. And you would be right to imagine that the taste and fragrance of orange take center stage in this impossibly moist and scrumptious cake.
Orange Olive Oil Cake Recipe
INGREDIENTS
1 1/3 cups Liokareas Orange Olive Oil
3 eggs
1 1/4 cups whole milk
1 1/2 tablespoons grated orange zest
1 finely sliced orange
1/4 cup orange freshly squeezed juice
1 tsp lemon or orange extract
2 tsp ground cardamom
1/4 tsp poppy seeds (optional)
1 3/4 cups granulated sugar
1 1/2 cups all-purpose flour
1/2 cup cake flour
1 1/2 teaspoons kosher salt, or to taste
1/2 teaspoon baking powder
1/2 teaspoon baking soda
1 1/2 cup lemon curd
INSTRUCTIONS
Preheat oven to 325F. Grease a loaf pan and line it with parchment paper. Brush the paper with butter. Arrange thin orange slices on the bottom of the paper-lined pan. If desired, sprinkle some poppy seeds into the spaces in between the slices. Set aside.
In a mixing bowl, beat olive oil and eggs together. Add milk, orange zest, orange juice, orange extract, and cardamom, and beat together. Once well combined, add sugar and beat for a minute more.
Now add flour, salt, baking powder, and baking soda and beat on low just long enough to blend.
Pour batter gently into the pan so that you don’t disturb the orange slices. Bake for 60 minutes. Test with a wooden skewer and continue to bake until the skewer emerges clean from the loaf.
Remove from oven. Gently insert a spatula between the paper and the pan to loosen. Let cool to room temperature before lifting the loaf out of the pan. Gently and slowly remove the parchment paper. Flip over onto a platter so that the orange slices are on top.
Warm the lemon over a low flame, stirring until it is loose and glaze-like. Spoon over the top of the loaf, letting the lemon curd drip generously down the sides.
Serve with a dollop of whipped cream. Garnish with edible flowers or fresh citrus zest.
RECIPE AND STYLING BY KEITH RECKER / PHOTOGRAPHY BY DAVE BRYCE
")