Home Blog Page 44

Experience the Day of the Dead in Mexico

0
A sugar skull painting sits on the corner of a building.

The end of October finds most Americans having Halloween fun with costumes, candy, pumpkins and parades. In Mexico, our neighbor to the south, many of the same elements (plus vast quantities of marigolds) combine in fascinating ways in the Day of the Dead holiday, celebrated on November 1 and 2. Both observances have shared roots in the Catholic traditions of All Hallows Eve, All Saints Day and All Souls Day, a triad in the church calendar which honors Catholicism’s more than 10,000 saints as well as the souls of the dearly departed who’ve left this life for the next.  

A group of people gather in the dark for Day of the Dead in Mexico with candles surrounding graves.

Experience the Day of the Dead in Mexico

While Halloween’s ghouls and goblins give us a whistling-in-the-dark chance to laugh off the prospect of death, Day of the Dead customs take on a different flavor.  Pre-Columbian beliefs at least 3,000 years old trace a complicated, nine-level transition from death bed to final repose. Aztec, Toltec, and Nahua families would begin the summer with gifts of food and water to sustain their loved ones during that long journey.

Marigolds cover graves to celebrate Day of the Dead in Mexico

During the Spanish period, these customs combined with autumn-time Catholic observances to create the Day of the Dead holiday, two days during which the barrier between the living and the dead dissolves, allowing ancestors to come back to visit, and offering the living a chance to remember and to honor them. Once a holiday celebrated mostly in the rural areas of Mexico’s southern states, Day of the Dead has grown in recent decades into a national, and increasingly international, ritual.

A woman walks through various offrendas in Mexico.

Remembering Those We Love

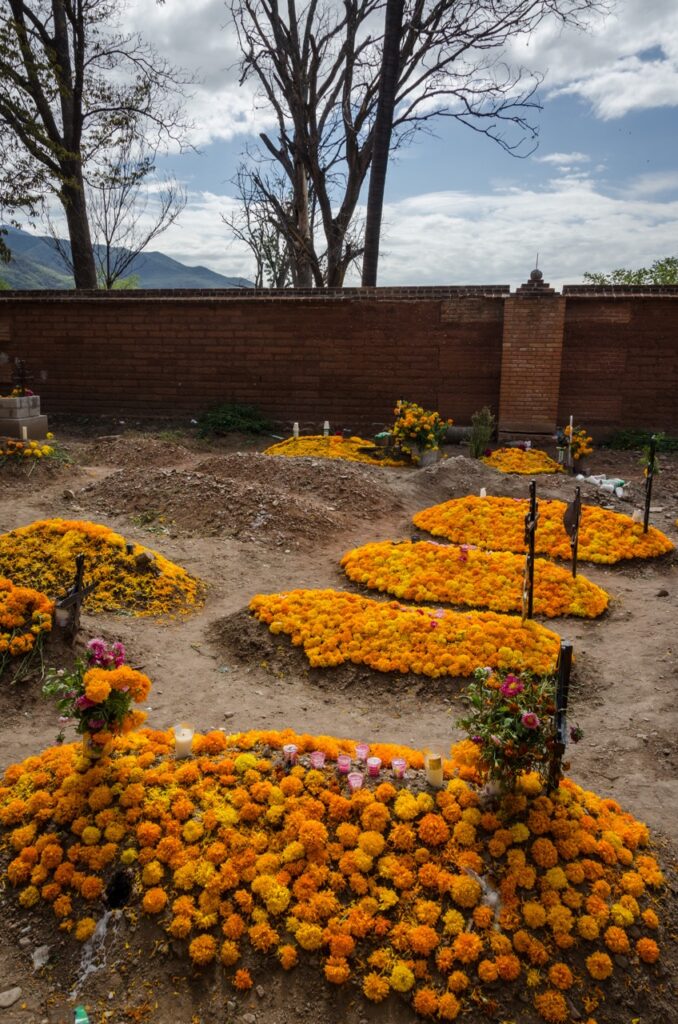
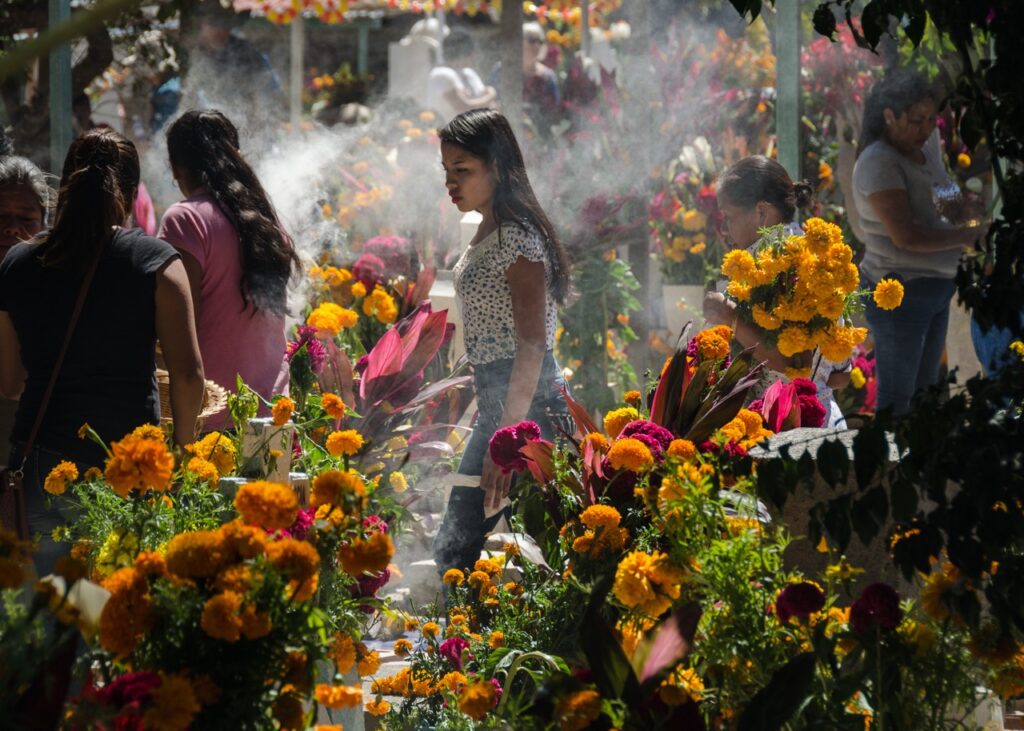
In Oaxaca, along Mexico’s southernmost Pacific coast, altars with the name ofrendas are in most homes, with elaborate arrangements of flowers, photographs, and offerings of water and food. Grandmother’s favorite dessert might sit next to a bowl of Uncle’s favorite soup and a stack of a beloved Cousin’s tortillas – all of it featuring marigolds, whose bright color and pungent aroma guide the old souls back home, and a candle for each departed relative. Images and sculptures of skulls and skeletons, and fragrant copal incense, both pre-Columbian traditions, complete the picture.

A woman covers her hand across her heart behind an ofrenda.

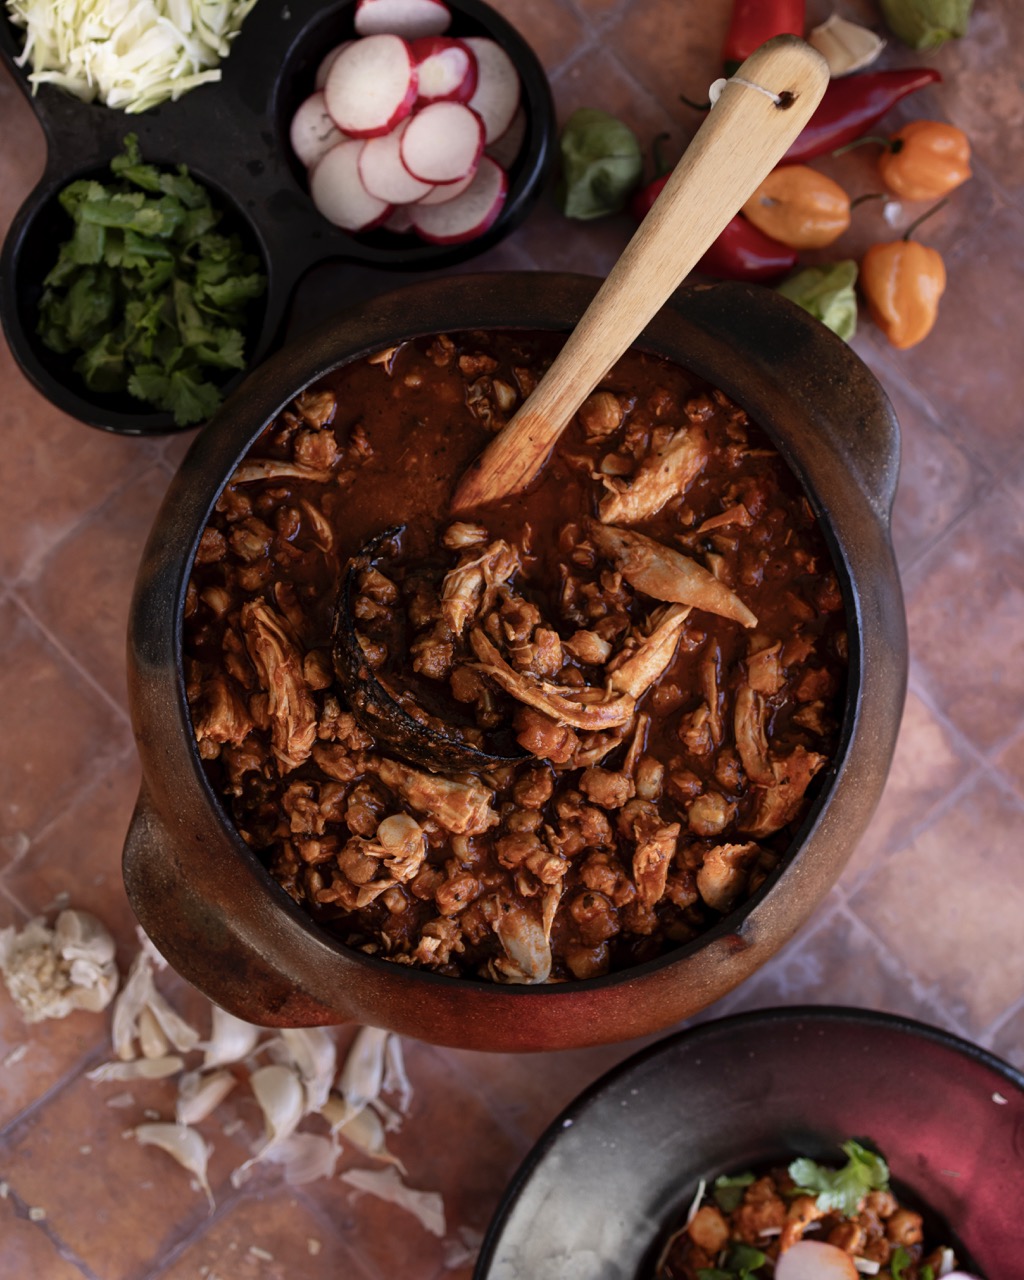
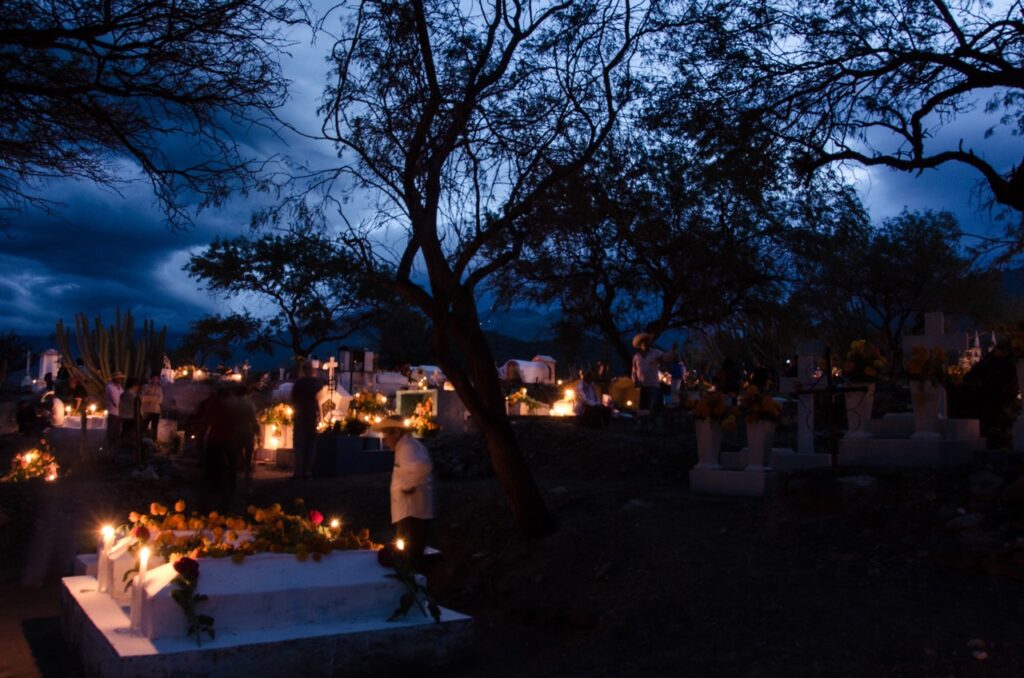
While centered in the home, observances spill out into the public sphere with open-air parties and processions to cemeteries just outside traditional town boundaries. Graves are decorated; pathways are strewn with marigold petals; sweet pan de muerto (bread of the dead) is served, along with other traditional foods; hot chocolate and pulque, a fermented agave beverage, are sipped. Pulque (along with beer and mezcal)  help fuel dancing and music and noise-making and general revelry in the streets. 

A man leans with his hand on his face with candles burning in the background.

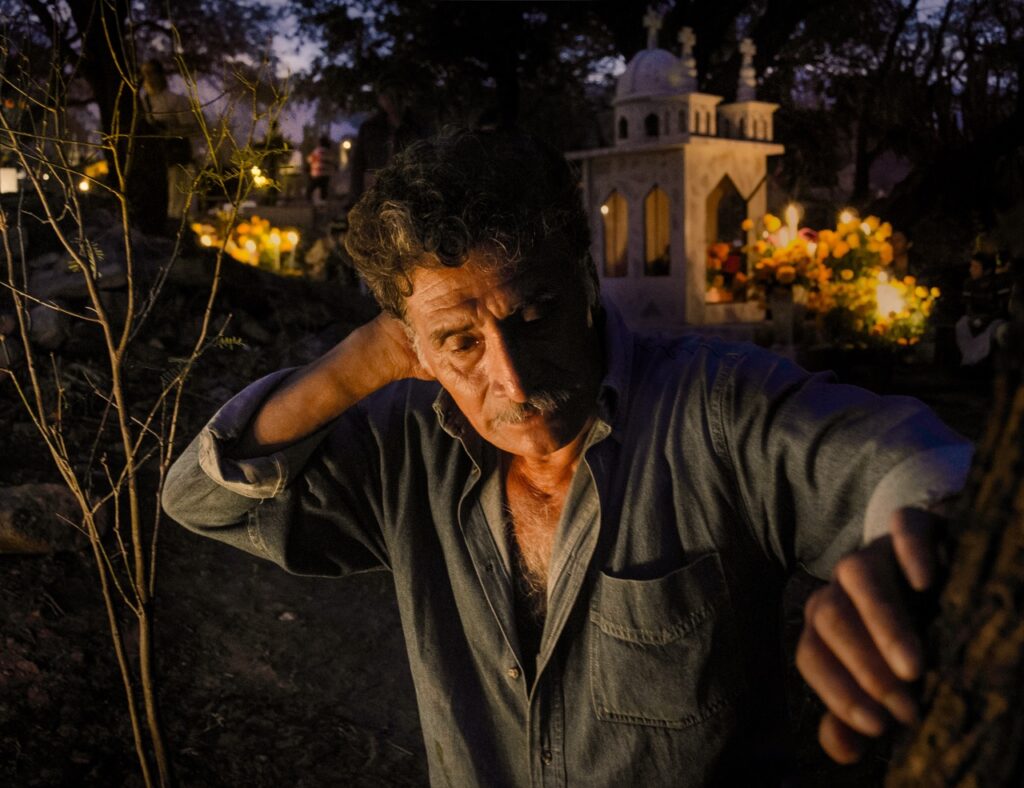
But these do not eclipse heartfelt moments of remembrance and mourning.  The point of the whole affair is to keep close the memories of dear ones, and to ease their loss by weaving the idea of death into a positive interaction with life. Perhaps this underlying intention, which addresses a primal human concern in ways at once poetic, tender, and joyous, is the reason for Day of the Dead’s increasing popularity.

A group of people gather around a grave for Day of the Dead in Mexico with candles and flowers covering the grave.

Story and Photography by Eric Mindling

Table to door subscribe print edition

Subscribe to TABLE Magazine’s print edition.

Crackly Sugar Cookies

0
A group of Crackly Sugar Cookies sit on a brown sitting board with festive decorations around them.

Sugar cookies are essential for the holiday season. They’re sweet, perfectly crunchy, and so tasty you’ll want to have one after another. They’re also one of those classic, holiday cookie recipes that’s simplistic enough for bakers of all levels. Plus, these Crackly Sugar Cookies allow you to decorate with your favorite sugar, sprinkles, or whatever else your holly jolly heart desires. The best part is getting to enjoy them alongside a glass of milk and bask in the fruits of your labor.

A stack of Crackly Sugar Cookies includes touches of gold and metallic sprinkles.

Why Use Cream of Tartar in Sugar Cookies?

Believe it or not, cream of tartar is a crucial ingredient in baking sugar cookies. This product helps to create a light, airy texture and prevent the cookies from spreading too much during baking. It acts also as a leavening agent, helping to create tiny air pockets in the dough. Additionally, cream of tartar helps to stabilize the egg whites, ensuring that the cookies maintain their shape and rise evenly. While it may not be the first ingredient that comes to mind, it is one of the most important.

Print
clock clock iconcutlery cutlery iconflag flag iconfolder folder iconinstagram instagram iconpinterest pinterest iconfacebook facebook iconprint print iconsquares squares iconheart heart iconheart solid heart solid icon
A stack of Crackly Sugar Cookies features metallic sprinkles and sugar on top.

Crackly Sugar Cookies


  • Author: Molly Eyler Mix
  • Yield: 2 Dozen 3-Inch Cookies 1x

Description

These sugar cookies are delicious and beautiful in presentation.


Ingredients

Scale
  • 3 1/2 cups (450 g) all-purpose flour 
  • 1 tbsp cornstarch 
  • 1 tsp baking soda 
  • 1 tsp cream of tartar 
  • 1 tsp salt 
  • 1 1/4 cups (250 g) granulated sugar  
  • ½ cup (100 g) light brown sugar  
  • 1 tbsp canola oil 
  • ½ cup (1 stick) (115 g) unsalted butter, softened  
  • ½ cup (85 g) vegetable shortening  
  • 2 large egg yolks 
  • 1 whole egg 
  • 1 tbsp vanilla extract or a combination of vanilla and almond extracts 
  • Coarse sugar, colored sanding sugar, or sprinkles 


Instructions

  1. Preheat the oven to 375 degrees. Line two baking sheets with parchment. 
  2. In a mixing bowl, whisk together the flour, cornstarch, baking powder, cream of tartar, and salt until evenly blended. 
  3. Combine both sugars, oil, butter, shortening, and vanilla in a separate large mixing bowl. With a paddle attachment of a stand mixer, or using a hand mixer, beat the ingredients for 3-5 minutes until light and fluffy. 
  4. Add the egg yolks and egg to the butter mixture and beat an additional minute until incorporated, scraping the bowl halfway through mixing.  
  5. With the mixer on low speed, slowly add the dry ingredients to the butter and egg mixture until a uniform smooth dough forms. 
  6. Using an ice cream scoop, portion dough into balls and roll in sanding sugar. (At this point, cookie dough may be refrigerated for up to four days, or frozen for several months.) 
  7. Bake cookies for 8-10 minutes, rotating halfway through baking, until tops are cracked and edges barely start to turn golden. Cool briefly, then transfer to baking racks to cool completely. 

Recipe by Molly Eyler Mix, Owner of Bakery Feliz / Styling by Julia Platt Leonard / Photography by Tira Howard

Table to door subscribe print edition

Subscribe to TABLE‘s print edition

Mom’s Iced Christmas Sugar Cookies

0
A few holiday themed Iced Sugar Cookies sit on a metal tin tray with ribbon and ornament bulbs around the try.

This Iced Sugar Cookie recipe has been passed down through generations since the late 1920’s. It’s a recipe rooted in tradition and succulent, homemade icing. You could go and buy a sugar cookie kit from the store. But, why bother whenever the love put into homemade cookies for the holiday season makes them so much more delicious. So, gather your kids, grandkids, family, friends, or whoever you’ll be spending this winter with and start this mouthwatering tradition. Not only do you get a treat as an end product but you’ll also create long lasting memories.

A bowl full of Iced Sugar Cookies in green and red colors and various shapes like stars, mittens, and snowmen.

Ideas for Decorating Iced Sugar Cookie

The creativity that Iced Sugar Cookies allow in the kitchen makes them a favorite for kids and adults alike. Let your artistry shine by cutting your cookies into different shapes and decorating them with details. For young children try simple designs like hearts, stars, or snowflakes. You can also try piping red and green candy canes or Christmas trees, bringing them to life with a touch of edible glitter. If you really want to go all out, you can get additional ingredients like chocolate chips and whipped cream to decorate gingerbread men, reindeer, or even Santa Claus himself.

Print
clock clock iconcutlery cutlery iconflag flag iconfolder folder iconinstagram instagram iconpinterest pinterest iconfacebook facebook iconprint print iconsquares squares iconheart heart iconheart solid heart solid icon
A few holiday themed Iced Sugar Cookies sit on a metal tin tray with ribbon and ornament bulbs around the try.

Mom’s Iced Christmas Sugar Cookies


  • Author: Dale Rice
  • Yield: 6 Dozen 2-Inch Cookies 1x

Description

Traditional and timeless, these Iced Christmas Sugar Cookies will remind you of leaving out cookies as a child for Santa.


Ingredients

Scale

For the Cookies:

  • 3/4 cup granulated sugar minus 2 tsp 
  • 1/2 cup vegetable oil 
  • 3 large eggs 
  • 1 tsp vanilla extract 
  • 2 cups plus 3 tbsp all-purpose flour (plus more for sprinkling on the dough to roll it out) 
  • 1 tsp cream of tartar 
  • 1/2 tsp baking soda 
  • 1/2 tsp salt 
  • Icing (below) 
  • Sanding sugar and colored sprinkles 

For the Icing:

  • 2 cups confectioners’ sugar 
  • 4 tbsp unsalted butter, softened 
  • 3 tbsp whole milk 
  • Pinch of salt 
  • 1 tsp vanilla extract 
  • Food coloring if desired 


Instructions

For the Cookies:

  1. Combine the sugar, oil, eggs, and vanilla in the bowl of a stand mixer with the paddle attachment or, if preferred, in a bowl using a large wooden spoon to beat by hand. Mix well.  
  2. Combine the flour, cream of tartar, baking soda and salt, and add to the liquid ingredients. Mix until there are no more streaks of flour. Chill for 2 hours or overnight. 
  3. Preheat oven to 365 degrees. Flour a surface for rolling the dough. Take half the dough (it will be very sticky), place it on the board, and liberally sprinkle with flour. Roll to desired thickness, using more flour as necessary to keep it from sticking to the counter or rolling pin. Cut out desired shapes. Place on a cookie sheet and bake for 7-8 minutes for 2-inch cookies, until they are puffed and soft. Move the cookies to a rack to cool. They will crisp up quickly. Ice and decorate with sugar or sprinkles or both. 

For the Icing:

  1. Combine all ingredients in a bowl and beat (with a mixer or by hand) until smooth and creamy.  
  2. Divide among small bowls and use food coloring for desired shades. Makes enough icing for 6 dozen 2-inch cookies.

Recipe by Dan Rice / Styling by Julia Platt Leonard / Photography by Tira Howard

Subscribe to TABLE‘s print edition

Italian Lemon Ricotta Cookies

0
A small pile of Lemon Ricotta Cookies sit on leaves of greenery with lemon peels scattered throughout.

Indulge in the delightful flavors of Italy with these homemade Lemon Ricotta Cookies. The perfect combination of tangy lemon zest, creamy ricotta cheese, and buttery shortbread creates a melt-in-your-mouth treat. These cookies are light, airy, and bursting with citrusy flavor. Enjoy them with a cup of tea or coffee for a truly satisfying snack. Not to mention, the sprinkles on top add a festive touch that’s a great accompaniment to any holiday dessert table.

Small round balls of Lemon Ricotta Cookies sit in little green wrappers.

What Does Ricotta Add to Cookie Recipes?

Ricotta cheese is a useful ingredient in many cookie recipes due to its creamy texture and subtle flavor. It adds a touch of moisture and richness to cookies, helping to create a tender and crumbly texture. The mild flavor of ricotta allows the other ingredients (like the lemon in our Lemon Ricotta Cookies recipe) to shine through, making it a versatile addition to a variety of cookie types. Additionally, ricotta cheese can help to prevent cookies from spreading too much during baking, resulting in a thicker, chewier cookie at the end.

Print
clock clock iconcutlery cutlery iconflag flag iconfolder folder iconinstagram instagram iconpinterest pinterest iconfacebook facebook iconprint print iconsquares squares iconheart heart iconheart solid heart solid icon
A small pile of Lemon Ricotta Cookies sit on leaves of greenery with lemon peels scattered throughout.

Italian Lemon Ricotta Cookies


  • Author: Richard Stangarone
  • Yield: 4 Dozen 1x

Description

A little sweet and a little sour makes for a bold flavor in these cookies.


Ingredients

Scale

For the Cookies:

  • 2 sticks salted butter, softened 
  • 1½ cups granulated sugar
  • 2 tsp vanilla extract 
  • Zest of 1 lemon 
  • 2 large eggs 
  • 2 cups whole milk ricotta cheese 
  • 4 1/2 cups all-purpose flour 
  • 2 tsp baking powder 

For the Icing:

  • 2 cups confectioners’ sugar 
  • Juice of 1 lemon 
  • Colored sprinkles if desired 


Instructions

For the Cookies:

  1. Preheat the oven to 375 degrees. Cover a pair of baking sheets with parchment paper or a silicone mat. 
  2. In a stand mixer, combine the butter with the sugar and cream well together over high speed, about 3 minutes. Add the vanilla and lemon zest and mix just to combine. Add the eggs and the ricotta and mix again to combine. Then add the flour and baking powder and continue mixing briefly until a cohesive dough forms.  
  3. Form cookies into a 1-inch balls and place about one inch apart on the baking sheet. Bake for 12 minutes or until golden brown. Allow the cookies to cool completely on the baking sheet before frosting. 

For the Icing:

  1. In a medium bowl, stir together the confectioners’ sugar and lemon juice. Dip a cookie in the icing, covering about 3/4 of the cookie, and return it to the baking sheet. Repeat with remaining cookies and icing. 
  2. While icing is still soft, scatter sprinkles, if you wish, over each cookie.

Recipe by Richard Stangarone / Styling by Julia Platt Leonard / Photography by Tira Howard

Table to door subscribe print edition

Subscribe to TABLE‘s print edition

Bisco-Chai-tos (A Chai Twist on Biscochitos)

0
A plate full of biscochitos with chai seasoning on top in the shape of yucca flowers.

Dive into a chai twist on the traditional biscochito. These Bisco-Chai-tos are for all the chai-tea latte lovers out there. They still have the cinnamon-sugary goodness of regular biscochitos but with an added bit of spice from a homemade mix of cardamom, ginger, clove, and nutmeg. Picture warming, comforting flavors filling your palate with each crunch of these delightful cookies. We also recommend having these Bisco-Chai-tos alongside a cup of tea that you can also add the chai spice mixture too. Talk about a chai-lovers heaven.

A big pile of biscochitos in yucca flower shapes with a dusting of cinnamon sugar and chai spice on top.

Tips for Making Biscochitos

To make the best Biscochitos, you want to start with high-quality ingredients. Choosing quality lard(or butter or shortening) and flour can be the difference between flat cookies that cannot hold their shape and crunchy cookies that are cooked evenly. After mixing your dough, there are a few steps you can take to ensure a delicious end product. Be sure to chill the dough after mixing and roll it out thinly for a crispy product. Lastly, we recommend using an izote or yucca flower shape in an ode to New Mexico state flower. 

Print
clock clock iconcutlery cutlery iconflag flag iconfolder folder iconinstagram instagram iconpinterest pinterest iconfacebook facebook iconprint print iconsquares squares iconheart heart iconheart solid heart solid icon
A pile of Bisco-Chai-tos cookies in a yucca flower shape and in a golden brown color.

Bisco-Chai-tos (A Chai Twist on Biscochitos)


  • Author: Marti Mills
  • Yield: 45 Cookies 1x

Description

This twist on New Mexico’s state cookie uses a hint of chai spice.


Ingredients

Scale

For the Chai Spice Mixture:

  • 1 tbsp ground cardamom 
  • 1 tsp ground cinnamon 
  • 1 tsp ground black pepper 
  • 1 tsp ground ginger 
  • 1/2 tsp ground cloves 
  • 1/2 tsp ground nutmeg

For the Cinnamon Sugar:

  • 1/4 cup granulated sugar 
  • 2 tbsp ground cinnamon 

For the Cookies:

  • 200 g (7/8 cup) lard 
  • 100 g (1/2 cup) granulated sugar  
  • 54 g egg, weighed in the shell (about 1 large egg)  
  • 45 g orange juice (the juice of 1/2 an orange)  
  • 1 1/2 tbsp chai spice 
  • 9 g (1 scant tsp) rum vanilla extract or other vanilla extract 
  • 400 g (3 1/3 cups) all-purpose flour  
  • 30 g (3 tablespoons) cornstarch 
  • 5 g (3/4 tsp) baking soda  


Instructions

For the Chai Spice Mixture:

  1. In a small bowl, stir together the chai spice mixture.

For the Cinnamon Sugar:  

  1. In a small bowl, stir together the sugar and cinnamon and reserve. 

For the Cookies:

  1. Preheat oven to 350 degrees. Cover a baking sheet, preferably light-colored metal, with parchment paper or a silicone mat. 
  2. With a stand mixer on high speed, whip together the lard, sugar, egg, orange juice, spice mixture, and vanilla until smooth and fluffy.  
  3. Sift together the flour, cornstarch, and baking soda together.  
  4. Add the dry ingredients to the mixer slowly, about one-third at a time. Stop mixing as soon as the dry ingredients are evenly incorporated. 
  5. On a lightly floured surface, with a floured rolling pin, roll the dough out 1/4 inch thick. 
  6. First cut out rounds with a 2 1/4-inch scalloped round cookie cutter. 
  7. Cut five slices down to the center of the round, making six “petals”. Fold the petals out to the sides, one by one, to make an izote or yucca flower shape.  
  8. Gently pick up the shaped cookie and dip the top in cinnamon sugar. 
  9. Bake on a parchment-lined baking sheet for 8 minutes, rotate the tray, and bake for an additional 8 minutes.  
  10. Remove from cookie sheet after 5 minutes, and cool on baking racks.

Other Variations to Try

Traditional Biscochitos

Green Chile Biscochitos

Recipe by Marti Mills / Styling by Julia Platt Leonard / Photography by Tira Howard

Subscribe to TABLE‘s print edition

Hermit Cups (Lemon Curd Cookie Cups)

0
On a brown plate sits little cookie cups with a swirl of icing and cinnamon on top of them.

These Hermit Cups get their name from the spiral swirl of mascarpone icing on top of Lemon Curd Cookie Cups. They come in bite size shapes that mix components of sweet, sour, and a bit of cinnamon spice for the perfect taste in a cookie. The best part is the simple ingredients we use in these cookie cups means you can make this recipe throughout the whole year, not just during the holidays. You could even experiment with different types of curds like cherry or strawberry curd for the summertime.

A person picks up a cookie cup from a plate of cookie cups decorated with a swirl of icing.

Tips for Perfecting a Lemon Curd

To create a velvety smooth and tangy lemon curd you have to start with fresh, juicy lemons. Zest the lemons to capture their bright citrus flavor and then squeeze the juice to add acidity. For an extra burst of flavor you can even add a teaspoon of vanilla extract or a splash of orange liqueur to your lemon curd. When you go to cook the curd, make sure it’s over low heat. You’ll have to stir continuously until the mixture thickens and coats the back of a spoon. Lastly, let the curd cool slightly before transferring it to a jar and refrigerating, trust us you’ll want to keep the additional curd.

Print
clock clock iconcutlery cutlery iconflag flag iconfolder folder iconinstagram instagram iconpinterest pinterest iconfacebook facebook iconprint print iconsquares squares iconheart heart iconheart solid heart solid icon

Hermit Cups (Lemon Curd Cookie Cups)


  • Author: Alexander Murph
  • Yield: 3 1/2 Dozen 1x

Description

These creative little cups holds a whole lot of flavor.


Ingredients

Scale

For the Cookie Cups:

  • ¼ lb (1 stick) unsalted butter, softened 
  • 1 cup dark brown sugar 
  • 1 extra-large egg, at room temperature 
  • ¼ cup molasses 
  • 2 cups plus 2 tbsp all-purpose flour 
  • 2 tsp baking soda 
  • 2 tsp ground ginger 
  • 1½ tsp ground cinnamon 
  • 1½ tsp ground cloves 
  • ½ tsp salt 
  • 1/3 cup golden raisins (minced) 
  • 1/3 cup crystallized ginger (not in syrup, minced) 
  • Spiced rum, such as Captain Morgan

For the Lemon Curd:

  • 4 large egg yolks 
  • 2/3 cup granulated sugar 
  • 1 tbsp lemon zest 
  • 1/3 cup fresh lemon juice 
  • 1/8 tsp salt 
  • 6 tbsp unsalted butter, softened, cut into small pieces 

For the Mascarpone Icing:

  • 2 cups heavy cream 
  • 1/4 cup confectioners’ sugar 
  • 8 oz mascarpone cheese, at room temperature 
  • 1 tbsp fresh lemon juice 


Instructions

For the Cookie Cups:

  1. With a stand mixer, cream together the brown sugar and butter until light and fluffy. Add the egg, scraping down the bowl every so often. Mix in the molasses.
  2. Whisk together the flour, baking soda, ground ginger, cinnamon, cloves, and salt. With your mixer on low, add these dry ingredients into the butter mixture in thirds, scraping down the bowl in between each addition. Mix in the raisins and crystallized ginger until just combined. Cover the mixture with plastic wrap and put in the refrigerator.
  3. The dough should chill for at least an hour, but you can also let it chill for up to 24 hours.
  4. When you’re ready, preheat the oven to 375 degrees.
  5. Grease a mini muffin pan, and measure out PRECISELY a 1 tablespoon ball of dough for each bin. This dough dries out and/or collapses very easily in the oven, so be careful to measure out the precise amount.
  6. Press down in the center of each ball with your thumb, making a little cup with it. Do not push the sides all the way to the edge of the bin; just make a thumb-sized imprint in the center.
  7. Bake in the center rack for 10 minutes. Again, be careful with how long you cook these, since you don’t want the dough to crisp too much.
  8. Let the cups cool in the pan for a few minutes, then move them to a wire rack. While they’re still warm, poke the centers of the cups with a toothpick about four times each, and pour 1/2 teaspoon of rum into each cup.
  9. Let cool completely on the racks, then cover and move the cups to the refrigerator.

For the Lemon Curd:

  1. Fill the bottom of a double boiler with water and bring it to a boil. Reduce the heat to a simmer.
  2. Whisk the yolks, sugar, lemon zest, lemon juice, and salt in the top of the boiler constantly as eggs cook. Whisk until curd thickens, about 10 minutes.
  3. Remove the curd mixture from the heat and whisk in the cut butter until it is entirely incorporated.
  4. Place the curd in a jar and cover it. Let cool completely in the refrigerator.
  5. Directly before you’re ready to use it, press the curd through a fine mesh sieve.

For the Mascarpone Icing:

  1. In a large, chilled mixer bowl, beat the heavy cream, powdered sugar, and lemon juice until you get soft peaks. 
  2. Add in the mascarpone cheese and mix until hard peaks. 

To Assemble:

  1. Place a small dollop of lemon curd in each of the cups. This curd recipe is precisely enough to fit every cup.
  2. Pipe some mascarpone icing on top of each cup with the curd.
  3. Dust the top with cinnamon.

Recipe by Alexander Murph / Styling by Julia Platt Leonard / Photography by Tira Howard

A footer photo with a black background and subscribe info and button

Subscribe to TABLE‘s print edition

Biscochitos

0
A grey platter full of flower shaped Biscochitos with cinnamon sticks sitting about the plate.

If you haven’t had Biscochitos, the state cookie of New Mexico, then you’ve been missing out on big flavor in a small, crunchy package. These cookies land somewhere between a shortbread and sugar cookie but with hints of anise and cinnamon. The use of lard in this recipe makes sure the texture of these cookies are buttery and crumbly. For our biscochitos, we use a scalloped cookie cutter to achieve a flower shape and a Zia stamp to decorate the tops. But, you can leave the cookie shape up to your creativity and go with something more classic like circles or stars.

A pile of flower-shaped biscochitos are arranged in a circular shape.

Why Are We Using Wine in a Cookie Recipe?

You may be wondering, why on Earth would you use wine in a sweet cookie recipe? Sweet table wine is actually a popular ingredient in biscochitos because it adds a subtle sweetness and a touch of complexity to the flavor. The wine also helps to moisten the dough, resulting in a tender and crumbly texture that you won’t receive otherwise. The sweetness of the wine also complements the other ingredients in the biscochitos, such as sugar, anise, and cinnamon, creating a harmonious and satisfying flavor profile.

Print
clock clock iconcutlery cutlery iconflag flag iconfolder folder iconinstagram instagram iconpinterest pinterest iconfacebook facebook iconprint print iconsquares squares iconheart heart iconheart solid heart solid icon
A pile of flower-shaped biscochitos are arranged in a circular shape.

Biscochitos


  • Author: Celina Grife

Description

You cannot go wrong with these beautiful anise cookies.


Ingredients

Scale

For the Cookies:

  • 6 cups all-purpose flour
  • 1 tbsp baking powder
  • 1 tsp salt
  • 1 lb lard
  • 1 ½ cups granulated sugar
  • 2 tsp anise seeds
  • 2 large eggs
  • ½ cup sweet table wine

For the Topping:

  • ¼ cup granulated sugar
  • 1 tbsp ground cinnamon


Instructions

  1. Sift flour, baking powder, and salt together in a medium bowl. In a stand mixer, cream together the lard, sugar, and anise seeds on medium speed. In a separate bowl, beat the eggs until light and fluffy. Add the eggs to the creamed mixture, followed by the wine. Beat in the flour mixture, in a couple of additions, until a stiff dough forms. If the dough won’t hold together, add a bit more wine. 
  2. Cover the dough and refrigerate it overnight. 
  3. Preheat the oven to 350 degrees. Cover a pair of baking sheets with parchment. 
  4. Remove the dough from the refrigerator and let stand until it is soft enough to roll. Divide the dough into quarters. Roll out each portion to about 1/16-1/8 inch in thickness. Cut with a 3-inch scalloped cookie cutter and place on baking sheets. Bake for 12-15 minutes, or until bottoms of cookies are golden brown.  
  5. Meanwhile, mix the sugar and cinnamon topping in a small bowl. Drop the warm cookies gently in the cinnamon sugar and set aside to cool.  

Recipe by Celina Grife / Styling by Julia Platt Leonard / Photography by Tira Howard

A footer photo with a black background and subscribe info and button

Subscribe to TABLE‘s print edition

Peppermint Crisp Sugar Cookies

0
Two baking trays hold a few brownish sugar cookies with peppermint topping.

When celebrating the holidays, peppermint is bound to pop-up, especially in cookies. Make the most of this staple ingredient with our Peppermint Crisp Sugar Cookies to celebrate the cold of the winter season in a joyful way. You’ll start with a sugar cookie base before adding in a crispy, peppermint candy filling. Just don’t forget to leave out a few of these delights beside a glass of cold milk for Santa Claus!

A stack of peppermint crisp sugar cookies with pieces of chocolate on top.

What is Turbinado Sugar? 

You’re probably used to seeing granulated and brown sugar in recipes but turbinado sugar may be something new to you. Thankfully, this type of sugar is not as complicated as it sounds. Turbinado sugar is a type of raw sugar that has undergone a minimal refining process. Think Sugar in the Raw. It retains a golden color and a slightly grainy texture compared to refined white sugar. Its very subtle molasses flavor makes it a great ingredient in our Peppermint Crisp Sugar Cookies for its unique flavor and visual appeal. Though, you can also use it as a natural sweetener in drinks like tea and coffee, which is where you’ll probably see this sugar most.

Print
clock clock iconcutlery cutlery iconflag flag iconfolder folder iconinstagram instagram iconpinterest pinterest iconfacebook facebook iconprint print iconsquares squares iconheart heart iconheart solid heart solid icon
A stack of peppermint crisp sugar cookies with pieces of chocolate on top.

Peppermint Crisp Sugar Cookies


  • Author: Nicole Appels
  • Yield: 18 Cookies 1x

Description

These sugar cookies combine the best parts of winter in a bite-sized portion.


Ingredients

Scale

For the Cookies:

  • 2 3/4 cups all-purpose flour
  • 1 tsp baking powder
  • 1/2 tsp kosher salt
  • 1 cup unsalted butter, softened
  • 1 1/4 cups granulated sugar
  • 2 large eggs
  • 1/2 tbsp fresh lemon juice
  • Tennis biscuits, about one 7 1/2 oz (200 g) box
  • Turbinado sugar

For the Peppermint Crisp Filling:

  • 500 ml heavy cream
  • 395 g dulce de leche
  • 3 peppermint crisp candy bars, chopped fine
  • Additional peppermint crisp candy bars, chopped


Instructions

For the Cookies: 

  1. Sift together the flour, baking powder, and salt in a medium bowl. 
  2. Cream together the sugar and butter with a stand or handheld mixer until pale in color and light and fluffy. Beat in the eggs and the lemon juice. 
  3. Add the dry ingredients to the butter-sugar mixture slowly, continuing to beat, just until combined.  
  4. Scoop the dough into balls with a small ice cream scoop, and place on a tray or baking sheet. Refrigerate the balls of dough for at least 1 hour. 
  5. Preheat the oven to 325 degrees. Line a pair of baking sheets with parchment paper. 
  6. Arrange about 9 tennis biscuits, side-by-side on each baking sheet. Roll cookie dough balls in the turbinado sugar and top each tennis biscuit with a ball.  
  7. Bake for 15 to 16 minutes, rotating the baking sheets halfway through the baking time. Then let cookies cool to room temperature. 

For the Peppermint Crisp Filling:

  1. Whip the cream in a large mixing bowl until soft peaks form. Add the dulce de leche and beat it in. Fold in the candy bar pieces. 
  2. Spoon the filling into a piping bag fitted with a round tip. Pipe the filling in a circular pattern around the top of each cookie. Sprinkle with additional chopped candy bar pieces over the top of each and serve. 

Other Sugar Cookies

Iced Sugar Cookies

Crackly Sugar Cookies

Recipe by Nicole Appels / Styling by Julia Platt Leonard / Photography by Tira Howard

A footer photo with a black background and subscribe info and button

Subscribe to TABLE‘s print edition

Blue Corn Macarons

0
A line of blue corn macarons with red floral pieces on tops sit on a silver ribbon on a grey table.

Blue Corn Macarons are elegant and a great choice for an edible gift to give to hostesses and families alike during the holidays. These little sandwich cookies have a light, airy cookie with a sweet vanilla bean ganache between them. You’ll notice these cookies have a bit of a blue hue due to the addition of blue cornmeal for a satisfying and sweet crunch. If you’ve always wanted to make macarons but were worried about the complicated process, we break down this recipe to ensure complete understanding for all levels of bakers. That way you can bask in your finish product while feeling like a successful baker.

A side view of blue corn macarons with a cream in between the cookies and a red floral decor top.

What is Blue Cornmeal?

Blue cornmeal is a type of cornmeal made from blue corn, a variety of maize with a distinctive blue kernel. It is often used in traditional Mexican and Southwestern cuisine. Blue cornmeal has a slightly nutty flavor and a coarser texture than yellow cornmeal. It is a good source of fiber, protein, and essential nutrients. And yes, it will add a tint of blue to whatever you’re creating.

Print
clock clock iconcutlery cutlery iconflag flag iconfolder folder iconinstagram instagram iconpinterest pinterest iconfacebook facebook iconprint print iconsquares squares iconheart heart iconheart solid heart solid icon
A table full of blue corn macarons with a red floral decoration on top of each.

Blue Corn Macarons


  • Author: Chainé Peña
  • Yield: 2 Dozen 1x

Description

Who knew blue cornmeal in a cookie could be so good?


Ingredients

Scale

For the Macaronage:

  • 130 g confectioners’ sugar
  • 140 g finely ground almond flour
  • 100 g of egg whites at room temperature
  • 90 g granulated sugar
  • 1/4 tsp cream of tartar
  • 25 g finely ground blue cornmeal

For the Vanilla Bean Ganache:

  • 200 g good quality white chocolate
  • 100 ml heavy whipping cream, to be heated
  • 190 ml heavy whipping cream, cold
  • 1 tbsp vanilla bean paste (you can substitute vanilla extract but paste is best)


Instructions

For the Macaronage:

  1. Sift confectioners’ sugar and almond flour together. Set aside.
  2. Meanwhile, in a stand mixer, whip egg whites to just foamy. Add 1/2 of the granulated sugar and all the cream of tartar. Whip another minute, then add remaining sugar. Whip to soft peaks.
  3. In a large mixing bowl, start to fold 1/2 of the dry sifted mixture to the meringue. Once incorporated, add the blue cornmeal. Fold until batter stretches easily into ribbons and can create a figure 8 without breaking. Don’t overmix or cookies will spread too much. Undermix and your cookies will crack.
  4. Fill a piping bag with a round tip. Chainé recommends a large 2A. Arrange silicon baking mats on a pair of baking sheets. You can purchase Silpat mats with a classic macaron size template; this will help you create a consistent size. Pipe macarons onto baking mats.
  5. Dry for 20 minutes. Meanwhile, preheat oven to 275 degrees.
  6. Bake for 10 minutes, rotate pans from front to back and top to bottom baking racks, and bake a final 10 to 12 minutes. Cookies are done when you gently push a shell and it doesn’t move.
  7. Allow macarons to cool fully before filling.

For the Vanilla Bean Ganache:

  1. Heat chocolate and 100 ml of cream in a bain marie until melted and fully combined. Use a spatula, rather than a whisk here, to avoid incorporating air while mixing. Take the pan off the heat and mix in the cold cream and vanilla. Chill overnight.
  2. Whip with a stand or handheld mixer until the ganache is stiff and pipeable. Spoon mixture into a piping bag with a round tip.
  3. Fill half of the macarons and top with the remaining macarons. Store in an airtight container for up to 4 days.

Recipe by Chainé Peña / Styling by Julia Platt Leonard / Photography by Tira Howard

A footer photo with a black background and subscribe info and button

Subscribe to TABLE‘s print edition

A Delicious Post-Farolito Gathering Near Canyon Road

0
A brown table is full of various desserts like three cakes and pieces of apricot candy.

A Christmas Eve stroll on historic Canyon Road in Santa Fe is a must. Luminous farolitos – brown paper sacks glowing from a candle within – line the historic, gallery-bedecked street while luminarias or bonfires – beckon carolers, looking to warm up on a cold winter’s night. But nab an invitation to a post-farolito walk party and you’ve won a holiday golden ticket. TABLE contributor Cyndy Tanner invites us along.

Two men smile at each other in conversation at a Christmas party with drinks in hand.

A Delicious Post-Farolito Gathering Near Canyon Road

Canyon Road on Christmas Eve is like a scene from a picture book, created by a gingerbread man and dusted in powdered sugar. Even the adobe walls seem as if they could exude enticing aromas of cinnamon, cloves, anise and ginger.  

But for locals, there is another tradition: a post-stroll open house for friends and family. Artist and designer Bob Brady and director, actor, writer, and producer Kent Kirkpatrick are renowned for their parties and for bringing together an eclectic group of artists and writers. Brady left his native Chicago in 1985 in search of adventure and happiness and found both in Santa Fe when he met and married Kent Kirkpatrick, a fourth-generation member of a Post, Texas ranching family. 

A tree sits in a dimly lit yard surrounded by farolitos (candles in paper bags).

Making a Home by Canyon Road

The duo began renovating homes, eventually finding their forever home. Brady quips, “We bought a $550,000 apricot tree and they threw in the house.”   

They took the structure down to the studs. Brady studied the house’s bones and did a sensitive redesign. The result is a serene, hand-trowel plaster sanctuary with a clay studio for Brady and a light-filled office for Kirkpatrick. Nestled into a hillside just off Canyon Road, their finished home is ideal for showcasing Brady’s sculpture, as well as the artwork of their tribe of artist friends. 

A group of people sit and eat at a dining room table as they're framed through window doors.

A Christmas Eve Bash That’s All Smiles

It’s also the perfect party home and the ideal place for a Christmas Eve bash. Guests included theater folk, photographers, a movie location manager, writers and visual artists. A curator from SITE Santa Fe recounted her recent studio visit to glacial optics artist Tristan Duke in LA. A puppeteer came directly from the dress rehearsal for the annual Gustave Baumann Christmas Show. The show even features the New Mexico Museum of Art’s replicas of Baumann’s historic marionettes.  

Guests arrived with host gifts, and homemade was the order of the evening. One brought hand-painted, one-of-a-kind watercolor bookmarks; another, a tin of light-as-air pizzelle cookies (a traditional Italian waffle cookie) and, yet another, a platter of chocolate chip cookies.  

An older man and a little girl play with a toy near the Christmas tree.

By mid-December, with Santa Fe’s party season already in full swing, the four food groups seem to be cream, sugar, butter, and alcohol. But Brady and Kirkpatrick’s party injected some seasonal splendor into the proceedings, courtesy of Mother Nature: persimmons, quinces, pomegranates, and clementines. Happily, they can do double duty as festive holiday décor, and as post-party ingredients. These colorful, delectable fruits are, well, décor you can eat! 

A brown table is full of various desserts like three cakes and pieces of apricot candy.

About the Menu

Of course, the occasion called for a special libation. Guests were welcomed with glasses of chilled Prosecco with a splash of Campari and a sprinkle of pomegranate seeds: the perfect way to get the party rolling (try the recipe here).

A person pours Campari into a Pomegranate Prosecco Cocktail in a champagne flute.

Their granite-topped kitchen island was heaving with delectable dishes, including a composed salad boasting colorful, roasted delicata squash, pomegranate seeds, pickled red onion, feta cheese, and red chile-spiced pecans, piled on a chiffonade of raw kale. 

Quince made star appearances in membrillo – a firm, sweet, quince paste – in homemade quince chutney, and as table decorations. Perfectly ripened persimmons were sliced razor thin, then served on a bed of arugula. The salad was topped with a zingy lemony vinaigrette and a generous sprinkle of bright green pistachio nuts (try the recipe and learn more about persimmons here).   

A red pot of stew sits by various bowls of chopped vegetables.

Traditional New Mexico favorites like Brady’s pozole rounded out the menu alongside banana leaf-wrapped tamales from Café Pasqual’s.  

An over-the-top dessert table amazed everyone. From the three-year-old guest wearing red patent leather party shoes to a seventy-something devoted Santa Fean, all were pleased. Center stage was Brady’s legendary olive oil cake. It’s flavored with Campari and finished with a stenciled powdered sugar heart (try the recipe here). Close by was his rosemary cake, studded with piñon nuts and raisins soaked in dessert wine. Mexican wedding cookies that looked like tiny snow globes vied for space. Plus, piles of biscochitos (try the recipe and learn more about biscochitos here) and gold-dusted star cookies join the table. Slivers of fruit cake, jewel-toned jelly candies, sugared cranberries and Lilliputian rosemary-twig Christmas trees added to the magic. 

On a platter and glass plate sit pieces of apricot candy and desserts with sprigs of rosemary in them.

Adding a Personal Touch to the Decor

Part of the joy of the holidays is using the heirloom finery. For Brady and Kirkpatrick, that includes brass candlesticks, sterling silver flatware and delicate champagne flutes from the Kirkpatrick side of the family. Brady’s handmade micaceous pottery cookware and his black clay bowls and plates added another personal touch of beauty to the stove and table.  

Antique candlesticks with lit candles on them sit on a long brown dining table.

As guests finished off the last crumbs of cake and sips of Prosecco, they gazed at a 100-year-old apricot tree. There it sat, glowing with farolitos and bringing light to one of the darkest nights of the season. Fittingly, they left with hugs and a jewel-toned jar of Kirkpatrick’s apricot jam. The jam was a sweet reminder of Spring to come, when their tree bursts out in delicate, snowy white flowers.  

Story by Cyndy Tanner / Photography by Tira Howard / Styling, Food, and Production by Parasol Productions

Subscribe to TABLE‘s print edition

Related News

Create a free account, or log in.

Gain access to read this article, plus limited free content.

Yes! I would like to receive new content and updates.