First time IFAM artist Fayne Robinson hails from Woodend, a small township in North Canterbury, New Zealand. You can visit her at the International Folk Art Market in Booth 9, Rooted in Community Neighborhood. She creates jewelry, neck and ear adornments. “We call them ‘taonga’ – treasures,” she says. She shares her recipe for Parāoa Parai or fried bread with us. “It is a staple with any meal,” she says, “a delicious and quick accompaniment that works with savory and sweet,” While it’s an everyday dish, it’s especially at home at large gatherings with family and friends. “Some people make it better than others, but all are memorable.” Her recommendation for recreating it in your kitchen? “Have light hands.”
More on Parāoa Parai
For Māori (Polynesian people of New Zealand), accompanying any meal with fried bread is a must. It’s easy, cheap, and a family meal favorite. Measuring ingredients is often done by eye and experience, so Robinson made a point of measuring for this recipe. You will find fried bread like Parāoa Parai at every tribal gathering, whether the occasion is a special meeting, a funeral, or a celebration.
Print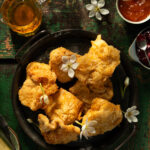
Paraoa Parai
- Yield: Serves 8–10, about 20 pieces of fried bread. 1x
Description
The best accompaniment for soups, stews, and so much more.
Ingredients
- 1kg self-rising flour – approximately 7 measured cups + additional flour for rolling out
- 5 tsp sugar
- 1 tsp salt
- 4–5 cups warm to hot water
- About 2–3 pints of cooking oil
- Serve with butter, jam, maple syrup, or honey
Instructions
- Into a large bowl, measure 7 cups flour, and then add the sugar and salt. With your fingers lightly mix the dry ingredients together.
- Add the warm-to-hot water, a cup at a time, to create a very wet mix. Don’t over work the dough, just combine gently without kneading it.
- Set aside the bowl of wet mixture while you heat the oil.
- Pour the cooking oil into a large pot over medium to high heat until it is hot but not smoking. The pot should be at least filled halfway so the dough has room to float. If the oil isn’t hot enough, the dough will soak up too much oil. If the oil is too hot, the outside will be cooked and the dough will be raw in the middle. You can test the oil temperature by sprinkling some flour into the oil, and if it immediately sizzles you are ready to fry.
- On a clean work surface generously sprinkle extra flour (up to 2 cups) and tip the bowl so the wet mix slides out onto the flour. Sprinkle more flour over the top of the wet mix.
- Using your hands, gently push down so the dough is about an inch deep.
- Cut into squares (or triangles, or rectangles, up to you), about 3 x 3 inches each. Portions can be smaller or larger, just adjust the cooking time.
- One by one, gently lift each square off the bench with a spatula and lower into the bubbling oil. The oil needs to be deep enough for the dough to float. Only place a few squares into the oil at once, so they have room to float freely. You will see them puff up somewhat as they cook. Resist the urge to frequently turn them over. When they are well-browned on one side, turn them over and let the other side cook. Often they will flip themselves over.
- With this first batch, check that your heat is right. When you think it’s cooked, scoop one out and cut it in half to see if it is cooked inside, and you can regulate and judge cooking time for the rest of your breads.
- Cook the rest of the portions in batches and drain on paper towels.
- These are best served warm, but still delicious cold, cut in half with butter and jam, honey, maple syrup, to your taste.
Special thanks to Nelly Mason of Hokitika, New Zealand for her Parāoa Parai recipe.
Recipe by Fayne Robinson
Styling by Anna Franklin
Photography by Dave Bryce
Subscribe to TABLE Magazine‘s print edition.
